In this article, we are going to see How to add an Admin user to the WordPress database, so that you can retrieve your Admin dashboard of the website.
Sometimes you get denied from accessing your WordPress dashboard due to various reasons. One of the reasons is that your website gets hacked or you forget your user id and password in the admin area. And another reason may be that the WordPress website gets broken or maybe some other technical issue.
To access your WordPress Admin dashboard area again, here is the new method to get into your Admin panel. It requires creating a new admin user account directly into the database table.
In this post, we use phpMyAdmin to add the new admin account to our WordPress website.
Why add an Admin user to the WordPress database:
Cyber attacks are common in today’s tech world, Sometimes Hackers become successful in finding your website’s vulnerability and may damage your website or make you denied from accessing the admin panel on your website.
These may occur as the admin account gets deleted by the hackers.
One of the other reasons may arrive to add an Admin user to the WordPress database, is that you may forget your user id and password.
To get access back to your WordPress admin account it is one of the best and most secure ways to add an Admin user to the WordPress using the phpMyAdmin.
phpMyAdmin is one of the web-based tools used for managing the MySQL database using a web browser such as Chrome or any other web browser.
Before doing any MySQL, query operations don’t forget to take a backup of your database.
How to add an Admin user to the WordPress database using phpMyAdmin:
Now, let’s see how to add an admin user to the WordPress database using phpMyAdmin.
For adding the new user to the database, you should have to follow the four steps: –
- Access the MySQL database using phpMyAdmin.
- Navigate to the wp_users table.
- Now Insert the new WordPress admin user in the user table.
- Inter the meta values to the MySQL database.
1. Access the MySQL database using phpMyAdmin:
You will find the phpMyAdmin in your hosting account, every hosting provider has the phpMyAdmin section in its hosting.
Now enter into the phpMyAdmin panel for adding new Admin users to your WordPress website.
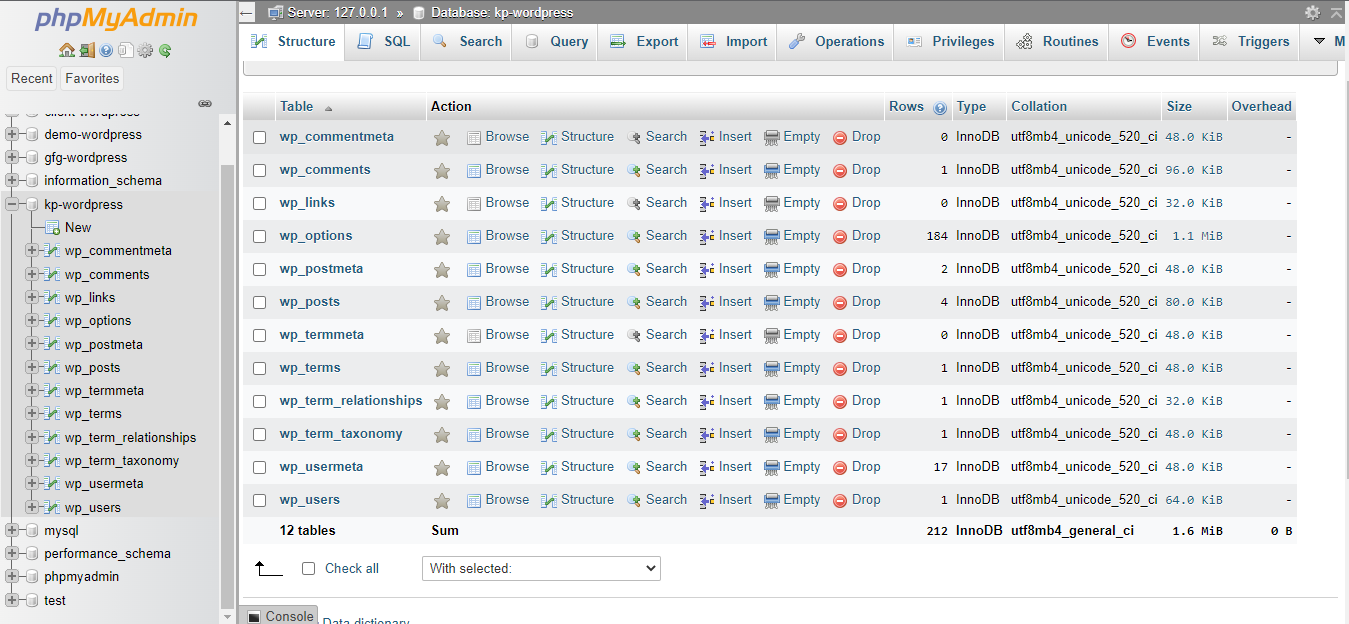
After clicking on the phpMyAdmin panel the panel of phpMyAdmin will appear like the above window on your browser screen.
2. Navigate to the wp_users table:
Into the phpMyAdmin panel, you have to find the “wp_users” table name from your WordPress website database.
In some cases, for security purposes, many WordPress users have set the prefix “wp” to something other. For example: [something]_users.
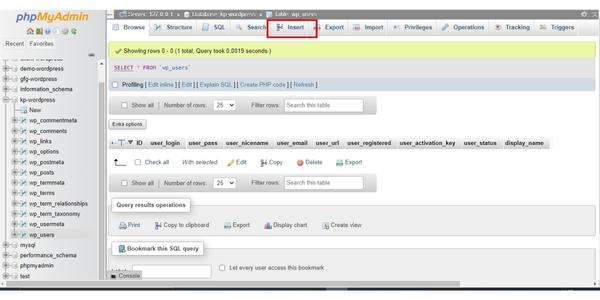
Double-click on the wp_users table, and you will find the admin users or other users if registered in the wp_table.
It is better to delete the existing user to avoid any unauthorized access to your website. And add the new Admin user to your WordPress website.
3. Now Insert the new WordPress admin user in the user table:
After deleting the other users from the “wp_users” table, now click on the insert button in the “wp_users” table to add a new admin account to WordPress.
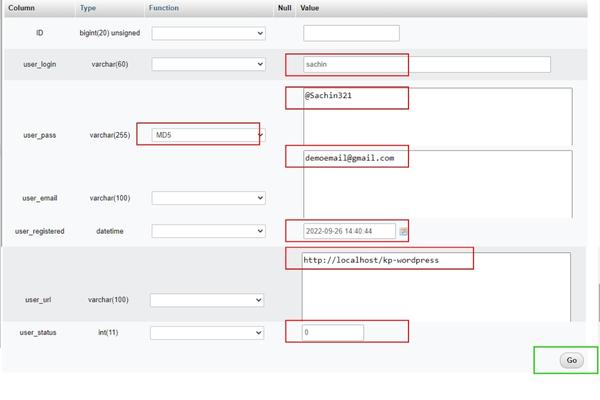
The new form will appear for adding the new admin users to your WordPress website.
Following things, you have to be filled in the form:
- user_login: Here you have to insert the user’s name which you want to set for the admin user.
- user_pass: In this field, you have set the password for your website and select MD5 in the function drop-down box.
- user_email: Enter the email id for the admin user.
- user_url: Enter the URL of your website, here I’m using the local host therefore I’ll enter the localhost URL. In your case, you should have to enter your main website URL.
- user_registered: Enter the current date and time of making the admin account.
- user_status: set it to 0 value.
Enter these 6 values in the phpMyAdmin, and left the other fields as it is.
This is how you can set all the necessary fields which are required for setting the new Admin account to your WordPress website.
After setting these values click on the “Go” button.
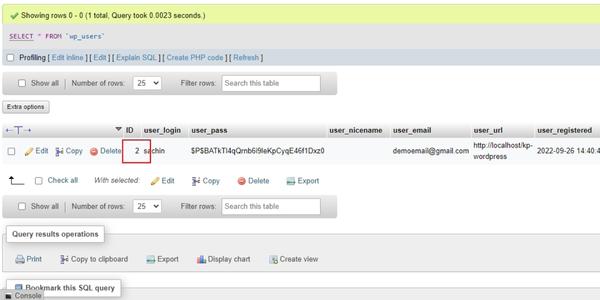
Also note the Id number after creating the admin user, because it will be used during the creation of user meta values.
In my case, the id number is 2, but it will be different in your case.
4. Inter the meta values to the MySQL database:
It is important to add the user to the user meta table, without adding the user to the meta table you could not get full access to the admin dashboard.
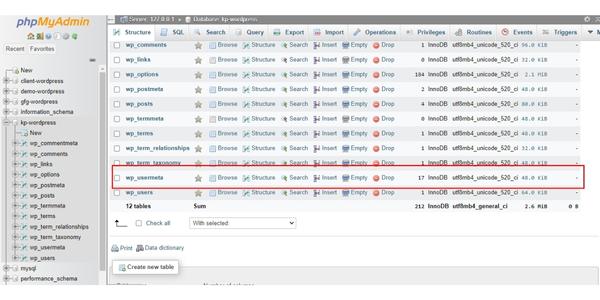
Find the “wp_usermeta” table in the database of your website.
Open the “wp_usermeta” table and click on the insert button to add the created user meta values which we have created above.
After clicking on the insert button you will get the form fields to be filled.
Now you have to fill in the following fields in the form:
- unmeta_id: Leave this blank it will generate automatically.
- user_id: enter the id number which you have created above for the admin user.
- meta_key: In this field enter the wp_capabilities.
- meta_value: In this field enter this : a:1:{s:13:”administrator”;s:1:”1″;}
Scroll down you will find the next fields to fill, which are as follow:
- unmeta_id: Leave this blank it will generate automatically.
- user_id: The id number which you have entered above for the admin user.
- meta_key: In this field enter the wp_user_level.
- meta_value: enter the value 10 in this field.
Click on the “Go” button to finally add the admin user to your WordPress website.
This is how you can add an admin user to the WordPress database. Hope this article helps you log in to your WordPress dashboard again and helps you to remove unauthorized access from your WordPress website.
And if you face any difficulty accessing your hacked website then you may contact us for technical solutions.


