
Are you a gym owner looking to expand your business online?
With a website, you can reach potential customers, showcase your services, and promote your gym’s unique brand.
In this step-by-step guide, we’ll walk you through the process of making a gym website using WordPress, the world’s most popular website builder.
Now, let’s get started…
Why is it important to have a gym website?
If you are running the gym, it is important to have a gym website so that anyone can register for the gym by visiting your website.
Having a gym website can be incredibly beneficial for a number of reasons.
Here are a few reasons why it’s important to have a gym website:
1. Reach More Potential Customers: A website allows you to reach more potential customers than just relying on traditional marketing methods.
With a website, people can easily find your gym online and learn more about services, pricing, and facilities.
2. Build Your Brand: A gym website is a great way to build your brand and showcase what makes your gym unique.
You can use your website to highlight your gym’s mission, values, and benefits of working out at your gym.
3. Provide Important Information: A gym website can provide important information to your members and potential customers, such as your gym’s hours, class schedules, trainer bios, and contact information.
4. Offer Online Sign-ups and Payments: With a website, you can offer online sign-ups and payments, making it more convenient for people to become members of your gym.
5. Increase Engagement: A website can also be a great way to increase engagement with your members and potential customers.
You can add a blog to your website where your post-workout tips, healthy recipes, and other fitness-related content keeps your audience engaged and motivated.
In summary, a gym website can help you reach more potential customers, build your brand, provide important information, offer online sign-ups and payments, and increase engagement with your audience.
With these benefits, having a gym website can be an essential part of your overall marketing strategy.
Creating the gym website in 4 Steps:
Creating a gym website is some time becomes difficult for the non-technical person, but here in this article, we are going to see how to create a gym website in 4 steps.
Now let’s dive into how to create the gym website.
Step 1: Choose a Domain Name and Web Host

When it comes to choosing a domain name and web host for your gym website, there are a few important things to consider:
1. Domain Name: Your domain name is the web address people will use to access your website.
Choose a domain name that is easy to remember, relevant to your gym, and unique.
It’s also important to choose a domain extension (.com, .org, .net, etc.) that works best for your gym.
2. Web Host: Your web host is the service that stores your website files and makes them accessible on the internet.
When choosing a web host, consider factors like uptime, speed, security, customer support, and pricing.
It’s also important to choose a web host that is optimized for WordPress, as this is the platform you’ll be using to build your gym website.
When it comes to choosing a domain name and web host for your gym website, there are a few important things to consider:
To choose a domain name, start by brainstorming ideas that are relevant to your gym’s name and services.
You can use a domain registrar like Namecheap or GoDaddy to check if the domain name you want is available.
If it’s not available, try adding a location, a keyword, or a modifier to make it unique.
For web hosting, there are many options available, including Bluehost, SiteGround, and WP Engine.
Look for a web host that offers reliable uptime, fast loading times, automatic backups, and excellent customer support.
It’s also a good idea to choose a web host that offers a one-click installation of WordPress, as this will make it easier to get started building your gym website.
Overall, choosing the right domain name and web host is an important first step in building a successful gym website.
Take the time to research and compare different options to find the ones that work best for your gym’s needs and budget.
Step 2: Install WordPress and Select a Theme
Once you have chosen a domain name and web host for your gym website, the next step is to install WordPress and select a theme.
Here’s how to do it:
Install WordPress: Most web hosts offer a one-click installation of WordPress, which makes it easy to get started.
Log in to your web host account and look for the option to install WordPress. Follow the prompts to install WordPress on your domain.
Select a Theme: A theme is a pre-designed template that determines the look and layout of your website.
There are many free and premium themes available for WordPress, but it’s important to choose a theme that is optimized for gym websites.
Look for a theme that is mobile-friendly, easy to customize, and has features like a class schedule, trainer profiles, and membership signup forms.

To select a theme, log in to your WordPress dashboard and navigate to the Appearance > Themes section.

Click on the “Add New” button to browse available themes.
You can search for themes by keyword or browse through popular themes. Once you find a theme you like, click the “Install” button to install the theme on your website.

Here for the demo purpose, I’m going to install the Astra theme. It is one of the best and light themes.

After the theme is installed, click the “Activate” button to make it your website’s active theme.
Once you have installed and activated your theme, you can customize it to fit your gym’s brand and services.
Most themes come with customization options that allow you to change colors, fonts, layouts, and more.
You can also add custom content like images, text, and videos to make your gym website unique and engaging.
Overall, installing WordPress and selecting a theme is a straightforward process that can be done in just a few clicks.
Choose a theme that fits your gym’s needs and branding, and then customize it to make it your own.
Step 3: Customize Your Website
Customize your website’s appearance and functionality using WordPress plugins and widgets.
You can add features like contact forms, social media integration, and photo galleries to showcase your gym’s facilities and trainers.
Remember to optimize your website for speed and search engines by using caching plugins, optimizing images, and creating high-quality content.
After installing and activating a theme for your gym website, the next step is to customize it to fit your gym’s brand and services.
Now let’s start customizing our gym website.
Update your Gym website Identity:
It is necessary to give your website name and identity so that anyone can easily identify it. You can add the logo and color scheme to your gym website.
The first thing you should do is update your site identity, which includes your website’s title and tagline.
To do this, go to Appearance > Customize > Site Identity in your WordPress dashboard.
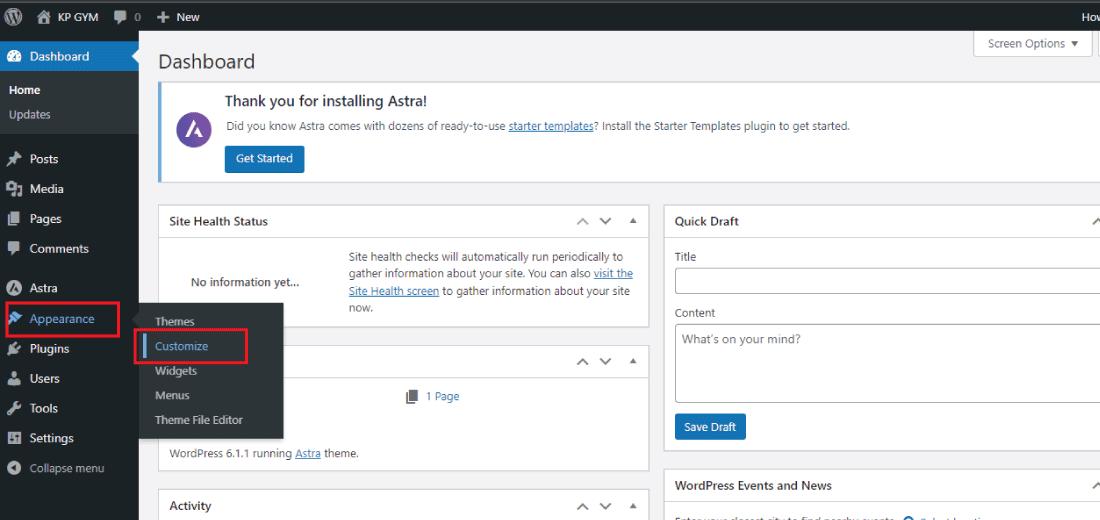
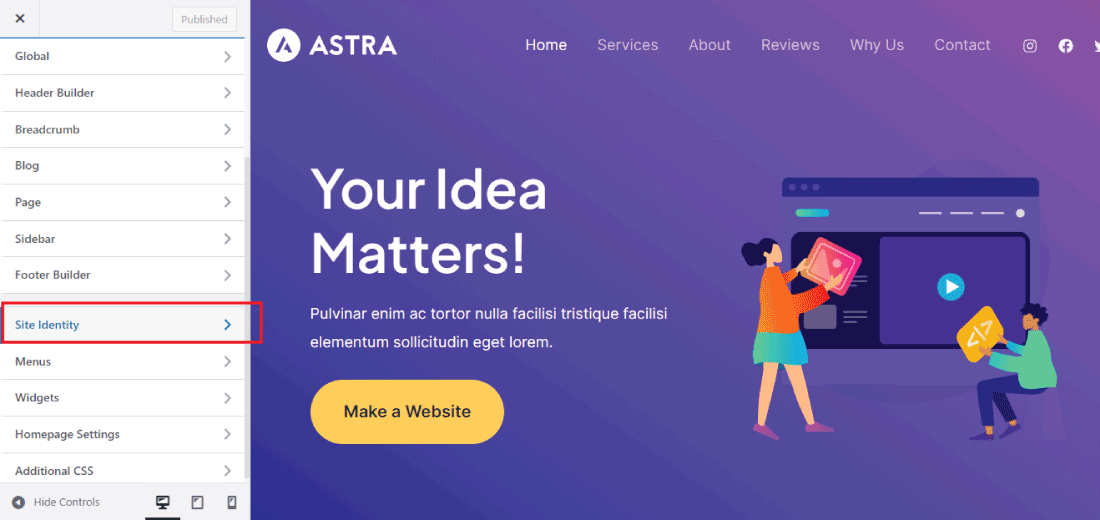
Now you will get the Astra theme customizer where you will customize the theme as you want.

Now you can also import the whole website template and then customize it according to your need and requirements.
To import the whole template just click on the publish button to import the template of the website.

After clicking on the publish button the whole website template gets imported to our website.

Now add the site logo and name. For this go to the site identity section and select the site logo and then click on the publish button to save all the changes.
After adding the logo click on the publish button.
You can also customize the color and fonts of your website in the customization section.
Most themes allow you to customize colors and fonts to match your gym’s brand.
Go to Appearance > Customize > Colors and Appearance > Customize > Typography to customize these elements.
Customizing Your GYM Website using Elementor:
Elementor is a popular page builder plugin for WordPress that allows you to create custom pages and layouts for your gym website.
Here’s how to customize your gym website using Elementor:
- Install the Elementor Plugin: Go to Plugins > Add New in your WordPress dashboard and search for “Elementor.” Install and activate the Elementor plugin.

-
- Now Create the Pages: Create the necessary pages for your gym website.
Here are some pages that would be helpful to include on a gym website:
- Home page: This page should introduce your gym and give visitors an overview of what they can expect.
- Membership options: Create a page that lists the different membership options and prices, along with any perks or benefits that come with each membership level. This page should also include information on how to sign up for a membership and any terms and conditions that apply.
- Classes: If your gym offers classes, create a page that lists the different types of classes you offer, along with the schedule and instructor information.
- About us: Use this page to tell the story of your gym, including its history, mission statement, and any notable accomplishments. This page can also include bios of key staff members, such as the owner or head trainer.
- Facilities: If your gym has specific facilities that set it apart from the competition, create a page that highlights these features.
- Testimonials: Ask current members to share their experiences at your gym and post their testimonials on this page. This can help build credibility and trust with potential new members.
- Contact us: Create a page that includes your gym’s contact information, such as your address, phone number, and email address.
- Blog: Consider creating a blog that offers helpful fitness tips and advice, as well as news and updates from your gym. This can help position your gym as an authority in the industry and drive traffic to your website.
These are the important pages that every gym website should have. For creating these pages go to Pages > Add New.
Now create all the pages for your gym website, the process for creating the page is the same for every page.
This is how you can create the web pages for your gym website.
3. Use Elementor to edit your pages: Now go to the page you want to edit or you can simply create a new page and start editing your web page.Elementor is very easy to use, you can customize the page as well as import the template from the elementor library.
Here I’m going to edit the home page of our KP Gym website using Elementor.
After clicking on “Edit with Elementor”. Now the Elementor editor will start appearing on the page you want to edit.
Customize the page using Elementor, it gives you the drag-and-drop feature to edit your WordPress pages.
This is how you can customize the pages using the elementor.


Step 4: Publish Your Website
This is the final step of making the gym website. After full customization of your gym website now it’s time to finally published your website.

Make sure all links and pages are working properly before launching.
You can also add Google Analytics to track website traffic and visitor behavior.
Above I have put the screenshot of our final customize KP Gym website.
Similarly, by following the steps you can also make a beautiful gym website for your physical gym.
This is how you can make the gym website, hope you find this article useful and helps you in creating the gym website.
And if you still have any problem creating the website then you can contact our team.
