
Do you want to add a social login to your WordPress website?
It’s an excellent way to allow users to sign in with their social media accounts and save them the hassle of creating a new account.
In this article, we’ll guide you through the easy steps to add social login to your WordPress website.
Let’s get started!
Why add social logins to the WordPress website?
Adding a social login to your WordPress website increases the user experience.
There are many benefits by which you can increase the number of users on your website and many more.
So, let’s see why we should add social logins to the WordPress website.
Social logins help to improve the user’s experience, as social logins make users easily logins to your website without remembering to the user id and password.
It saves the user time and effort and hence makes the users to engage more with your website.
Social logins decrease the barriers of entry points to your website and hence increase the conversion rates. Here the users don’t need to fill out the forms and irritating personal details.
Users like to make purchases where the sign-up process is easy and straightforward. That’s why all eCommerce websites start providing social logins to their website.
Social logins help you collect better user data such as he social media, demographics, age, and gender.
This information helps you to better target your audience by running marketing campaigns.
Overall, adding social logins to your WordPress website can enhance the user experience, increase conversion rates, provide valuable user data, and improve website security.
It’s a simple and effective way to optimize your website for better engagement and growth.
Install and Activate the Social Login Plugin to your Website
To add the social login to your WordPress website, you must first add the social login plugin to your website.
To install the plugin to your WordPress website first go to the plugin section and then click on the “Add New” button to add the plugin.
Now search for the “Nextend Social Login” in the WordPress search box. Click on install now and activate the plugin on your website.

After the successful installation of the Nextend social login to the website. It will start appearing in the WordPress dashboard in the section settings > Nextend Social Login.
Click on the Nextend Social Login to configure the settings on the website.

Now the Nextend social login setting dashboard starts appearing in your window.

After the successful installation of the plugin to your WordPress website, now it’s time to configure the plugin to your website.
Configure the Nextend Social Login to your website
Now let’s see how to configure the Nextend Social login to your WordPress website.
For configuring the social login to the WordPress website go to the settings section and then click on “Nextend Social Login”.
Now choose the social account to which you want to add the social login to your website.
For the demo purpose here I’m going to choose “Facebook” you can follow the same method to configure other social media accounts to your website.

Click on the “Getting started” button to start the configuration of the social login to your website.

In the general setting make all the settings that are required for the website and then click on the “Save changes” button to save the settings.

Now switch to the login form settings and do the necessary changes as per your website requirement.
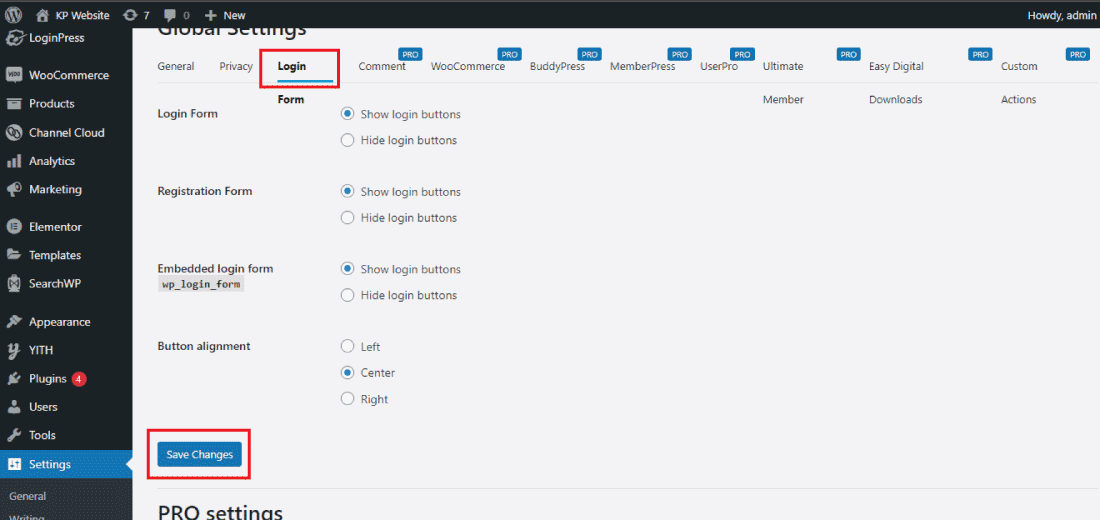
After enabling the settings in the login form, now click on the “Save changes” button to save the settings that you have made in the social login plugin.
Choose the style of the Social Login button
You can also change the style and color of the social login.
For changing the style of the social login to your WordPress website go to the buttons section and then choose the style which you like the most.

After choosing the style click on the save changes button to save the settings that you have made.
And the final step is you have to configure the social login with the Facebook dev tool for that simply go to the Facebook developer tool.
Set up API keys for each social media platform you want to use. API keys are used to connect your website to the social media platform’s authentication system.
The plugin’s documentation should provide instructions on how to obtain API keys
Before making the social login feature live on your website, it’s a good idea to test it to ensure that everything works correctly.
Try logging in with different social media accounts to make sure that users can log in and that the plugin is collecting user data correctly.
By following these steps, you can easily configure a social login plugin for your WordPress website and offer your users the convenience of logging in with their social media accounts.
Conclusion
In conclusion, adding social login to your WordPress website is a simple and effective way to enhance user experience, increase conversion rates, provide valuable user data, and improve website security.
By following the steps outlined in this article, you can easily configure a social login plugin and add social login buttons to your website.
With the right social login plugin and proper configuration.
you can make it easier for users to sign up and log in to your website, and encourage them to engage more with your content.
Remember to test the social login feature before making it live on your website, and monitor user data to make informed decisions about your marketing and engagement strategies.
Overall, social login is a valuable tool for any WordPress website looking to optimize the user experience and grow its audience.
